Preparing a remote server before the first simulation
Contents
Preparing a remote server before the first simulation#
To be able to run simulations with ASAP on remote servers, you have to make
sure that the remote environments fulfil a few requirements. First of all,
each remote server must provide a work environment compatible with the Unix
standards. This includes any Linux distribution, any BSD distribution, and
MacOS X to a large extent. Proprietary Unix-based systems are also
supported. This is not required for the local computer.
In this appendix, we provide instructions on how to configure remote
servers.
NOTE: The following steps have to be done only once on each remote server
and are not necessary for local simulations.
Make sure the user on the local computer can connect through SSH.
See section SSH connection.
Make sure that you have access to the correct version of
Python 3 on the remote server. See
section Python interpreter.
The first step in configuring a remote server for ASAP is to connect to it
through SSH. Depending on the remote server provider policy the secutiry
protocol access might vary.
We suggest to connect through SSH to remote servers with public-key authentication,
see section .
We highly recommend OpenSSH, which is available for most Unix-like
systems.
On Windows 10, you can install the OpenSSH Client following the steps below:
Type app in the start search bar.
Select “settings app”.
In the “Window Settings” which appears, click on “Apps”.
Then click on “Optional features” and “Add a feature”.
Look for OpenSSH Client, click on it and install.
If you encounter any problems in setting up openssh, please refer to your
network administrator or to the OpenSSH documentation for installation
instructions.
SSH connection often require to input a password, the password can be inputed
directly in ASAP, please refer to the option Required password at connection time
in section Adding a remote machine.
Alternatively, the SSH connections can take place through public keys in a
non-interactive way. This means that your local account must have a
public-private SSH key pair properly configured and that the local public
key must be registered on the remote server.
Once you have made sure that this is the case, you can proceed
with the configuration of the remote server using this connection.
Please follow the steps below if you wish to configure an SSH public-key
authentication access.
Generate public-private SSH key pair on Windows 10#
Open a powershell instance and use ssh-keygen to generate the
public-private SSH key pair,
ssh-keygen
Follow the instructions to generate the id_rsa, id_rsa.pub files.
Register the local public key on the remote server#
Access the .ssh/ folder in your home using the command:
cd$HOME/.ssh
and list the files in the folder:
ls
Add the contents of your machine public key (id_rsa.pub) at the end of
the $HOME/.ssh/authorized_keys file, located on the remote server. Create
the authorized_keys file if it does not exist.
Note: Be careful to append your key to the file, preserving its previous
contents, or you might become unable to connect to it from other computers
than the current one.
Connect to the remote server through SSH to confirm that it does not ask you
for a password. At most, you should be asked for the passphrase of your
SSH key.
Independently of the program used to run remote simulations, the remote
server must provide a working Python 3 environment.
Please note that Python version 3.8 or above is required on the remote
server or the simulations will fail. If you are not sure how to access a
Python 3 installation, please ask your server administrator to provide you
with instructions on how to do so.
Once you are able to run a Python interpreter, you can check that it
provides a couple of essential modules by running it:
python
and typing the following commands in the Python console:
importpip
importvenv
If one of these 2 commands fails, please ask your server administrator to
install the corresponding Python module or provide you with an alternative.
Once done, you can exit from the Python console by typing Ctrl-D (or
Cmd-D on MacOS).
Write down any command required to make Python visible to your system at the
bottom of the .simune_env file.
You do not have Python already avaialable in yout machine: Miniconda#
If your remote machine does not provide with the proper python version you can
easily install it yourself.
One possible option to do that is to use Miniconda.
Run the wget command to download Miniconda package,
The package necessary to install the python libraries
that ASAP needs to run a simulation on a remote server
can be downloaded using the following links
Connect to the remote cluster using ssh command and
unzip the folder,
unzipsimune-asap-remote-env-XXXX.X.zip
and enter the folder
cdsimune-asap-remote-env-XXXX.X
If you want to make sure that the installed environment corresponds to a specific version
of Python, simply remove the simune-remote-env-py.tgz files associated with the other
versions. For instance, if you have a Python 3.10 environment, you would type:
If all files are present, the installer will always try to install the environment for the most
recent Python version.
Finally, run the following command,
bash./install-simune-env.sh
and wait for the script to finish. At the end, it will display instructions and explanations on
how to use your new environment with ASAP. Please make a copy of these instructions
before closing the connection.
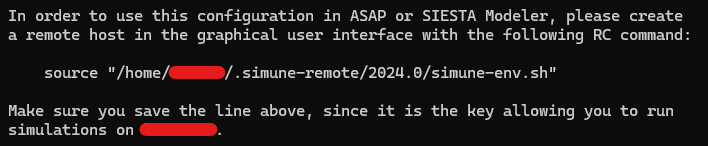
Fig. 26 Copy the line starting with “source” in the remote RC command,
please see section Adding a remote machine.#
If you already have SIESTA installed or you don-t need it you can skip this part.
If you want to run simulations with SIESTA, the next step is to install a
SIESTA binary on the remote server. For this, you can either ask your server
administrator to install SIESTA for you and explain how to access it, or
request a SIESTA binary for your architecture to Simune.
Please note that Simune can provide binary executables for several operating
systems, namely Windows 10, MacOS X Yosemite and Catalina, as well as
Debian, Fedora, and Ubuntu Linux. It will also soon be possible to get
Singularity images.
Please send a request to info@simuneatomistics.com mentioning the operating
system and architecture of the server to receive download instructions. If
you already requested a tarball of ASE, you will likely have received this
executable at the same time.
Once SIESTA is installed, you may receive instructions on how to adjust the
server environment so that the SIESTA executable can be found by the
operating system.
Installing TranSIESTA/TBtrans on the remote server#
If you already have TranSIESTA installed or you don-t need it you can skip this part.
If you want to perform transport simulation on your system, you need to have
installed TranSIESTA and TBtrans executable on your remote server. As for
SIESTA, you can either ask your server administrator to install the
executables for you and explain how to access them, or request a TranSIESTA
and TBtrans binary for your architecture to Simune.
Please send a request to info@simuneatomistics.com mentioning the operating
system and architecture of the server to receive download instructions.
Once the executables are installed, you may receive instructions on how to
adjust the server environment so that the executables can be found by the
operating system. Write down any command required to make two executables
visible to your system in the .simune_env file. See section Adding a program.
Setup ASAP to allow the connection to the cluster#
Cannot connect to remote servers after Windows upgrade#
If connections to remote servers were working before a Windows upgrade and
stop doing so afterwards, it is likely because the SSH agent has been
disabled.
To re-enable it, open a PowerShell terminal with Administrator privileges
and type:
Set-Servicessh-agent-StartupTypeAutomatic
Then reboot the computer.
If this still doesn’t work, open a normal PowerShell terminal and type:
ssh-add $HOME/.ssh/id_rsa
If your key has a different name, please substitute id_rsa with the
actual key name.
Restart ASAP after adding the key. This should now work.
If you still have trouble, please consult your system administrator.
SIMUNE is a company expert in
Atomistic Simulations. We offer services for leading industrial,
academic, and research customers working with materials (semiconductors,
energy storage, new compounds, etc.). SIMUNE trains researchers on atomic
scale simulation techniques and collaborates with them in complex simulation
challenges. Besides, SIMUNE provides them with professional support in
order to accelerate and optimize the materials design process.
ASAP (Advanced Simulation Atomistic Platform) software is a product of
Simune Atomistics S.L. ASAP is composed of a set of tools and modules
developed around atomistic simulation codes to facilitate their use for
industrial users. ASAP includes a SIESTA calculator interface.
Upcoming versions of ASAP will provide interfaces with other computational
engines, some of which working at different scales than SIESTA.
ASAP is designed to fulfill the following main objectives:
Make popular materials modeling codes available to industrial users.
Gather the relevant tools and codes within a unified user interface, in
order to improve their usability.
Automate the existing workflows for the simulation of materials properties
and industrial problems of interest.
Soler, José M, Emilio Artacho, Julian D Gale, Alberto Garcı́a, Javier
Junquera, Pablo Ordejón, and Daniel Sánchez-Portal. 2002. “The SIESTA
Method for Ab Initio order-N Materials Simulation.” Journal of Physics:
Condensed Matter 14 (11): 2745–79.
https://doi.org/10.1088/0953-8984/14/11/302.